Skip to content

Connect to SharePoint in an AAD Application permission context with a certificate stored in Azure KeyVault

Use Case

You work on a Web Application (or API) which is connected to a SharePoint Tenant.

You want to setup things correctly and want to execute SharePoint actions in Azure Active Directory (AAD) Application permission context.

Goal of this article

This article will show how to work with a SharePoint site through an API or a Web Application, only with AAD Application permissions.

It will demonstrate how to setup everything and how to connect with a certificate stored in a Key Vault, step by step, in UI, PowerShell and Azure CLI.

Let's see the final result below

alt text

The Web Application (or API)...

  1. Requests access to the Key Vault, in order to get the stored certificate
  2. Gets the Key Vault certificate
  3. Authenticates to Office 365 using the SharePoint AAD Application with the certificate
  4. Gets a ClientContext with the requested API permissions
  5. Uses the ClientContext object to query the SharePoint site
  6. Gets Web info

(I've shrinked the 3. because there are somes requests are made to https://login.microsofonline.com, more info here)

Prerequisites

  1. An Office 365 (Dev) Tenant or a Partner Demo Tenant
  2. An Azure subscription and the following Azure AD role at least
    • Application Administrator
  3. Command Interface (one of these)
  4. Visual Studio (2017 or later)

Why authenticating by certificate and not by Client ID / Secret

In AAD Application permission context, for unknown reason, you can't work with SharePoint REST API using Client ID / Secret connection. It only works with a connection using Client ID / Certificate.

I've posted a solution as an answer on Stack Overflow a couple months ago.

But in some cases, you have no choice but to work with a Client ID / Secret (like for example writing in the User Profile Service). In that case, use the legacy App-Only principal context

Why using two Azure PowerShell Modules

Even if Microsoft provides a module that covers most Azure resources and the most popular is Az PowerShell, this one does not cover all features regarding AAD.

For instance, let's compare one command and the options provided.

New-AzADApplication New-AzureADApplication
-DisplayName -DisplayName
-IdentifierUris [-IdentifierUris]
[-HomePage] [-Homepage]
[-ReplyUrls] [-ReplyUrls]
[-AvailableToOtherTenants] [-AvailableToOtherTenants]
[-KeyCredentials] [-KeyCredentials]
[-PasswordCredentials] [-PasswordCredentials]
[-StartDate] /
[-EndDate] /
[-CertValue] /
[-Password] /
/ [-AppRoles]
/ [-Oauth2Permissions]
/ [-AddIns]
/ [-AllowGuestsSignIn]
/ [-AllowPassthroughUsers]
/ [-AppLogoUrl]
/ [-ErrorUrl]
/ [-GroupMembershipClaims]
/ [-InformationalUrls]
/ [-IsDeviceOnlyAuthSupported]
/ [-IsDisabled]
/ [-KnownClientApplications]
/ [-LogoutUrl]
/ [-Oauth2AllowImplicitFlow]
/ [-Oauth2AllowUrlPathMatching]
/ [-Oauth2RequirePostResponse]
/ [-OrgRestrictions]
/ [-OptionalClaims]
/ [-ParentalControlSettings]
/ [-PreAuthorizedApplications]
/ [-PublicClient]
/ [-PublisherDomain]
/ [-RecordConsentConditions]
/ [-RequiredResourceAccess]
/ [-SamlMetadataUrl]
/ [-SignInAudience]
/ [-WwwHomepage]

As you can see, the AzureAD Module provides more options just in this example.

And as stated here, the AzureAD module is the one to use when working with AAD.

Connect to Azure

1
2
3
4
5
Connect-AzAccount # -Subscription "SUBSCRIPTION_ID" -TenantId "TENANT_ID" (if you have multiples tenants)
# Wait for prompt to get credentials

Get-AzContext | select Account, Tenant
# Check if the context is correct
1
2
3
4
5
Connect-AzureAD # -TenantId "TENANT_ID" (if you have multiples tenants)
# Wait for prompt to get credentials

Get-AzureADCurrentSessionInfo | select Account, Tenant
# Check if the context is correct
1
2
3
4
5
az login # --tenant "TENANT_ID" (if you have multiples tenants)
# Authorize with Device Code

az account show --query '[user.name,tenantId]'
# Check if the context is correct

Create Key Vault (and the Ressource Group)

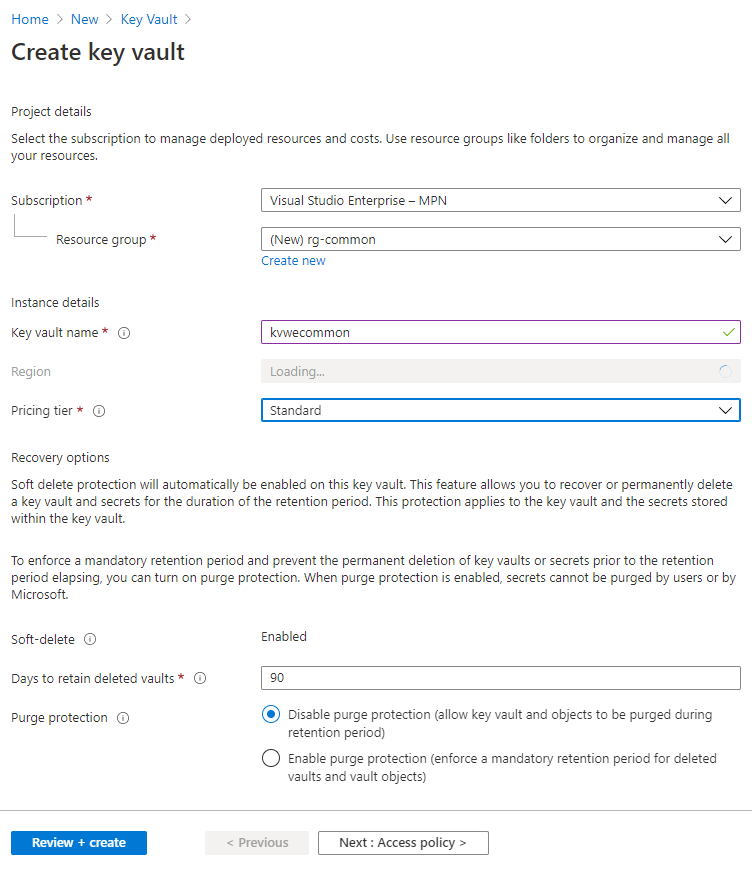
The first step is to create the Key Vault that will store the certificate.

Create Key Vault through interface
alt text

Create Key Vault with code

1
2
3
4
5
# Create Resource Group
New-AzResourceGroup -Name "rg-common" -Location "westeurope" # -Tag @{Environment="Production"; Department="HR"} (if tags are required by your organization)

# Create KeyVault
New-AzKeyVault -VaultName "kvwecommon" -ResourceGroupName "rg-common" -Location "westeurope"
1
2
3
4
5
# Create Resource Group
az group create -l westeurope -n "rg-common" # --tags Environment="Production" Department="HR" (if tags are required by your organization)

# Create KeyVault
az keyvault create --resource-group "rg-common" --name "kvwecommon"

Add certificate to Key Vault

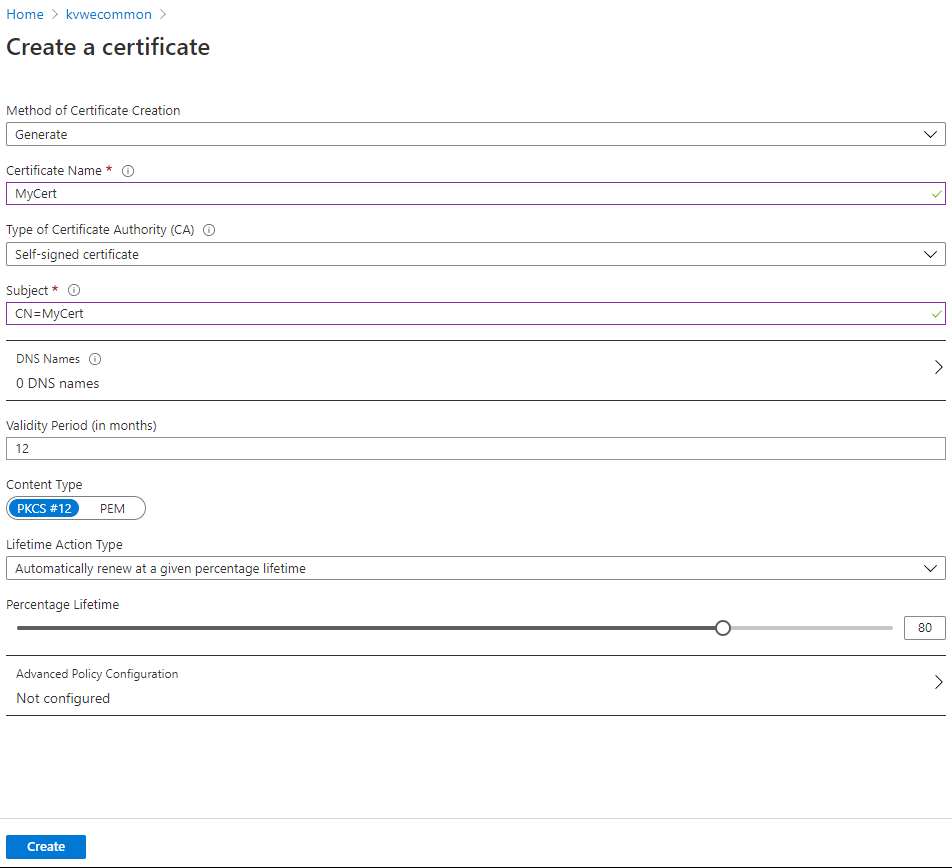
Once the Key Vault is created, we'll use its certificate creation feature to init one.

Add certificate through interface
alt text

Add certificate with code

1
2
3
4
5
6
# Add yourself the permissions to get secret (for testing locally the solution later) and to write in the certificates store
Set-AzKeyVaultAccessPolicy -VaultName "kvwecommon" -EmailAddress "YOUR_EMAIL_ADDRESS" -PermissionsToSecret get -PermissionsToCertificates import,create,get,list -PassThru

# If you want to set an expiration delay beyond 12 months, specify a value with the -ValidityInMonths parameter
$policy = New-AzKeyVaultCertificatePolicy -IssuerName 'Self' -KeyType RSA -RenewAtPercentageLifetime 80 -SecretContentType application/x-pkcs12 -SubjectName 'CN=MyCert' -ValidityInMonths 12
Add-AzKeyVaultCertificate -VaultName "kvwecommon" -Name "MyCert" -CertificatePolicy $policy
1
2
3
4
5
6
# Add yourself the permissions to get secret (for testing locally the solution later)
# You can get your info with "az ad signed-in-user show --query objectId"
az keyvault set-policy --name "kvwecommon" --object-id "YOUR_OBJECT_ID" --secret-permissions get

# If you want to set an expiration delay beyond 12 months, specify a value with the --validity parameter
az keyvault certificate create --vault-name "kvwecommon" -n "MyCert" -p "$(az keyvault certificate get-default-policy)"

Like said before, to connect to SharePoint as an application, you have two options:

  • using the AAD Application context (accepts Client ID / Secret and certificate)
  • using the SharePoint App-Only principal context (accepts Client ID / Secret)

As we'll authenticate with a certificate, the only way is to use the AAD Application context.

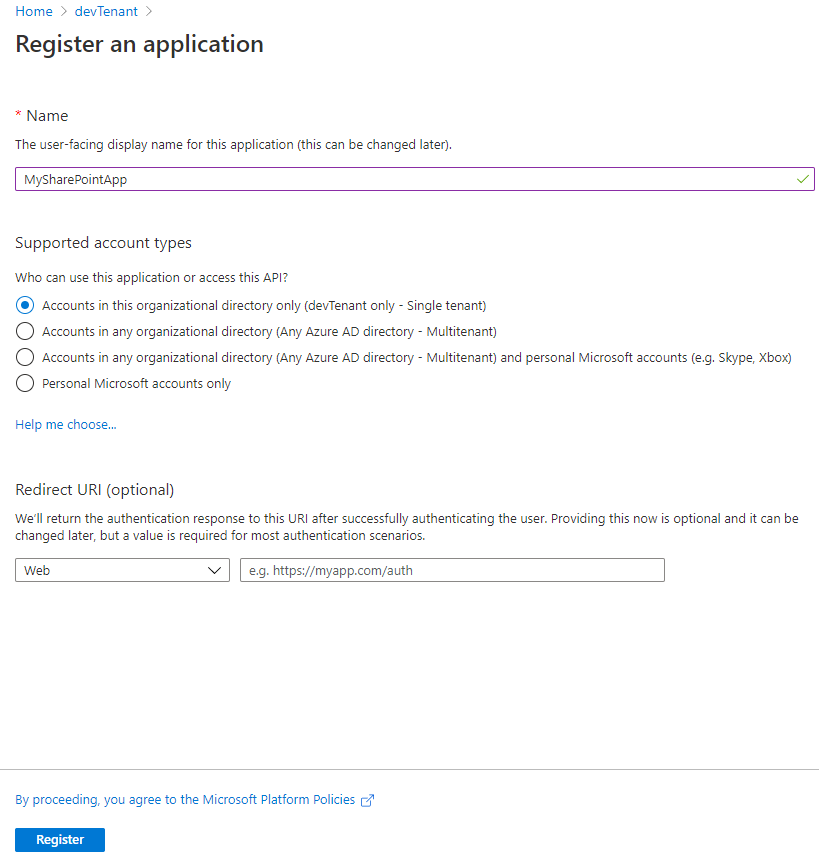
Register AAD App through interface
alt text

alt text

Register AAD App with code

To register Application permissions, you have to indicate which API you want to use and check the permissions required for you needs. If it's transparent for you when you register through the Azure Portal, let me explain how does it work under the hood.

Whether you want to work with SharePoint, Microsoft Graph, Dynamics or else, each service is registered as a service principal (Enterprise Application in AAD). And each of these contains AppRoles (for Application permissions) and Oauth2Permissions (Delegated permissions).

You'll notice later in the article that, for those service principals, we can refer to them as AppId and ObjectId. Depending on the command executed, the ObjectId will be required because it's unique, instead of the AppId which is the same whatever the organization is. For instance, the AppId for SharePoint is 00000003-0000-0ff1-ce00-000000000000 and for Microsoft Graph 00000003-0000-0000-c000-000000000000.

From the moment where you want to add permissions, you must register your application as a service principal too, in order to enable those permissions for your organization.

Instead of the AAD Application registration user interface, you have to declare both AAD Application and its service principal (the Enterprise Application)

Now that you know this, we'll see how to register the appropriate permissions and especially when admin consent is required.

Register AAD App with PowerShell

 1
 2
 3
 4
 5
 6
 7
 8
 9
10
11
12
13
14
15
16
17
18
19
20
21
22
23
24
25
26
27
28
29
30
31
32
33
34
35
36
37
38
39
40
41
# Here, we'll use the AzureAD Module

# Get the service principal for "Office 365 SharePoint Online"
$adspSPO = Get-AzureADServicePrincipal -Filter "AppId eq '00000003-0000-0ff1-ce00-000000000000'"

# If you want to get all the available Application permissions
$adspSPO.AppRoles

# If you want to get all the available Delegated permissions
$adspSPO.Oauth2Permissions

# First, declare SharePoint permissions you want to provide to your AAD Application
$reqSPO = New-Object -TypeName "Microsoft.Open.AzureAD.Model.RequiredResourceAccess"
$reqSPO.ResourceAppId = "00000003-0000-0ff1-ce00-000000000000"

# Here, we add Application permissions that will require admin consent
$roleId = "678536fe-1083-478a-9c59-b99265e6b0d3"
$reqSPO.ResourceAccess = New-Object System.Collections.Generic.List[Microsoft.Open.AzureAD.Model.ResourceAccess]
$reqSPO.ResourceAccess.Add([Microsoft.Open.AzureAD.Model.ResourceAccess]::new($roleId,"Role")) # Sites.FullControl.All

# But if you want to add Delegated permissions that will require admin consent
$reqSPO.ResourceAccess.Add([Microsoft.Open.AzureAD.Model.ResourceAccess]::new("a468ea40-458c-4cc2-80c4-51781af71e41","Scope")) # TermStore.Read.All
$reqSPO.ResourceAccess.Add([Microsoft.Open.AzureAD.Model.ResourceAccess]::new("0cea5a30-f6f8-42b5-87a0-84cc26822e02","Scope")) # User.Read.All

# Register the AAD Application
$aadApp = New-AzureADApplication -DisplayName "MySharePointApp" -AvailableToOtherTenants:$false -RequiredResourceAccess $reqSPO

# Then, add you as an owner of the AAD Application
# Get your ObjectId
$yourself = Get-AzureADUser | ?{$_.UserPrincipalName -like "*PART OF YOUR MAIL ADDRESS*"} | select ObjectId

# Add yourself as an owner
Add-AzureADApplicationOwner -ObjectId $aadApp.ObjectId -RefObjectId $yourself.ObjectId

# Register the AAD Application as a service principal
$aadspapp = New-AzureADServicePrincipal -AppId $aadApp.AppId

# Add the App Role Assignment mentioned before
# This will grant admin consent
# Execute this cmdlet as much as you have Application permission roles that requires admin consent
New-AzureADServiceAppRoleAssignment -ObjectId $aadspapp.ObjectId -Id $roleId -PrincipalId $aadspapp.ObjectId -ResourceId $adspSPO.ObjectId

Register AAD App with Azure CLI

 1
 2
 3
 4
 5
 6
 7
 8
 9
10
11
12
13
14
15
16
17
18
19
20
21
22
23
24
25
26
27
28
# If you want to get all the available Application permissions for "Office 365 SharePoint Online"
az ad sp list --filter "appId eq '00000003-0000-0ff1-ce00-000000000000'" --query '[].appRoles[].{Value:value, Id:id, DisplayName:displayName}' -o table

# If you want to get all the available Delegated permissions for "Office 365 SharePoint Online"
az ad sp list --filter "appId eq '00000003-0000-0ff1-ce00-000000000000'" --query '[].oauth2Permissions[].{Value:value, Id:id, UserConsentDisplayName:userConsentDisplayName}' -o table

# Declare SharePoint Application permissions
# Sites.FullControl.All
permissions='[{"resourceAppId":"00000003-0000-0ff1-ce00-000000000000","resourceAccess":[{"id":"678536fe-1083-478a-9c59-b99265e6b0d3","type":"Role"}]}]'

# Or declare SharePoint Delegated permissions (here permissions requested are TermStore.Read.All, User.Read.All)
# permissions='[{"resourceAppId":"00000003-0000-0ff1-ce00-000000000000","resourceAccess":[{"id":"a468ea40-458c-4cc2-80c4-51781af71e41","type":"Scope"},{"id":"0cea5a30-f6f8-42b5-87a0-84cc26822e02","type":"Scope"}]}]'

# Register the SharePoint AAD Application with the required permissions
az ad app create --display-name "MySharePointApp" --required-resource-accesses $permissions

# Add yourself as an owner of the SharePoint AAD Application
# You can get your info with "az ad signed-in-user show --query objectId"
az ad app owner add --id "AAD_APP_OBJECT_ID" --owner-object-id "YOUR_OBJECT_ID"

# Register the AAD Application as a service principal
az ad sp create --id "AAD_APP_OBJECT_ID"

# Grant admin consent
# Execute this command if you have Application permission roles that requires admin consent
# /!\ You can face a 400 error when executing this command from Cloud Shell.
# If so, run "az login" first. Known issue : https://github.com/Azure/azure-cli/issues/11749
az ad app permission admin-consent --id "AAD_APP_OBJECT_ID"

For now, if you want to work with delegated permissions on PowerShell, there's no cmdlet to grant admin consent (instead of Azure CLI, as you've see before).

The only approach is to use Microsoft Graph, which provides methods to add / consent Delegated permissions. Full example here.

 1
 2
 3
 4
 5
 6
 7
 8
 9
10
11
12
13
14
15
16
17
18
19
# Back in Az PowerShell
# Assume that the Delegated permissions have been added before, through the New-AzureADApplication cmdlet

# First, init Graph session token
$context = Get-AzContext
$ResourceGraphURI = "https://graph.microsoft.com/"
$graphToken = [Microsoft.Azure.Commands.Common.Authentication.AzureSession]::Instance.AuthenticationFactory.Authenticate($context.Account, $context.Environment, $context.Tenant.Id.ToString(), $null, [Microsoft.Azure.Commands.Common.Authentication.ShowDialog]::Never, $null, $ResourceGraphURI).AccessToken

# Declare the scopes you want to grant access (enter the same)
$body = @{
        clientId = $aadspapp.ObjectId
        consentType = "AllPrincipals"
        principalId = $null
        resourceId = $adspSPO.ObjectId
        scope = "AllSites.FullControl"
}

$apiUrl = "https://graph.microsoft.com/v1.0/oauth2PermissionGrants"
Invoke-RestMethod -Uri $apiUrl -Headers @{Authorization = "Bearer $($graphToken)" }  -Method POST -Body $($body | ConvertTo-Json) -ContentType "application/json"

Register Web Application / API Application

Now, we're going to create the resource that will query the SharePoint site. It can be a Web Application or an API.

In this example, it will be a Web Application (but in the end, the code used for connecting to SharePoint will be the same).

Once the Web Application created, you will have to enable Managed Identity, in order to allow the resource to access the Key Vault. This will lead in the creation of a service principal you'll be able to find in the AAD Enterprise Applications page.

Register the resource through interface
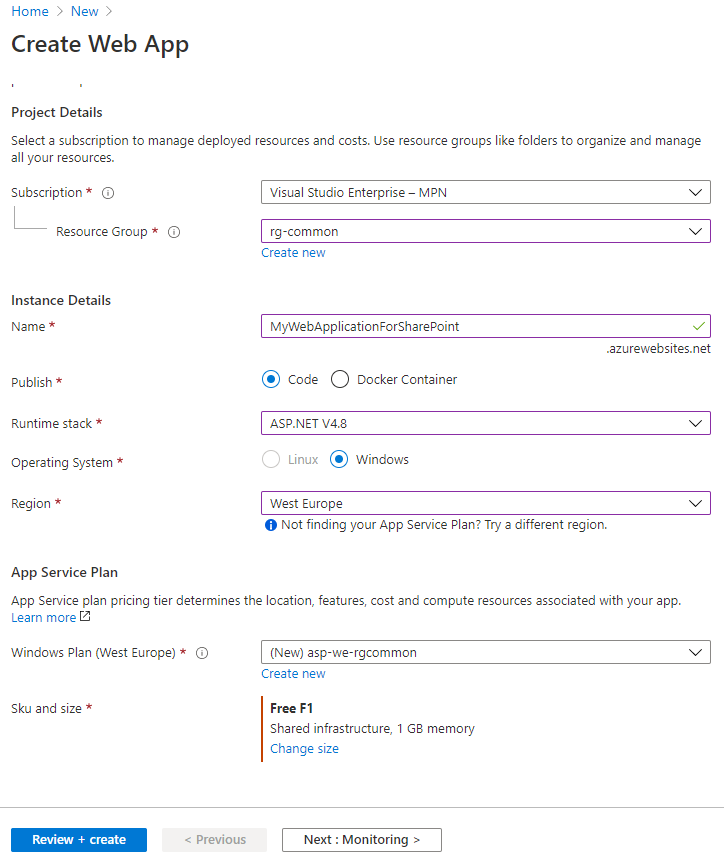
alt text

Enable Managed Identity through interface
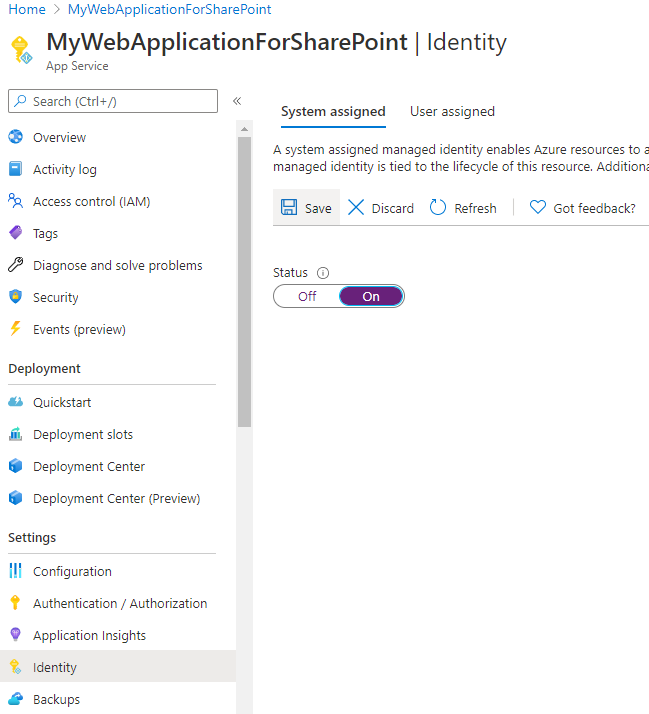
alt text

Register the resource with code (and enable Managed Identity)

 1
 2
 3
 4
 5
 6
 7
 8
 9
10
# Create App Service Plan based on Windows
$appSerPlan = New-AzAppServicePlan -ResourceGroupName "rg-common" -Name "asp-we-rgcommon" -Location "westeurope" -Tier "Free"

# Create Web Application
# /!\ Actually, there's no possibility to specify the Stack / Runtime with this command
# /!\ But by default, it will create an ASP.NET 4.8 one (as the App Service Plan is hosted on Windows)
New-AzWebApp -ResourceGroupName "rg-common" -Name "MyWebApplicationForSharePoint" -Location "westeurope" -AppServicePlan $appSerPlan.Id

# Enable Managed Identity (= creating a service principal)
Set-AzWebApp -ResourceGroupName "rg-common" -Name "MyWebApplicationForSharePoint" -AssignIdentity $true
1
2
3
4
5
# Create App Service Plan (if does not exists)
az appservice plan create --resource-group "rg-common" --name "asp-we-rgcommon" --location "westeurope" --sku F1

# Create Web Application (and its service principal)
az webapp create --resource-group "rg-common" --name "MyWebApplicationForSharePoint" --plan "asp-we-rgcommon" --runtime "aspnet|V4.8" --assign-identity

Upload Key Vault Certificate into AAD Application

By importing the certificate (created with the Key Vault) in the AAD Application, you allow an authentication to SharePoint when requesting access to the Tenant, with a Client ID / Certificate.

Upload through interface
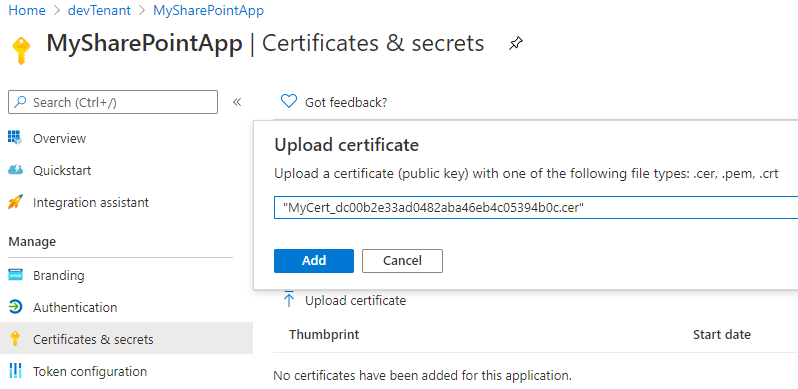
alt text

Upload with code

1
2
3
4
5
6
# Get previsouly created certificate
$myCert = (Get-AzKeyVaultCertificate -VaultName "kvwecommon" -Name "MyCert").Certificate
$certString = [Convert]::ToBase64String($myCert.GetRawCertData())

# Upload the certificate to the SharePoint AAD Application
New-AzADAppCredential -ObjectId $aadApp.ObjectId -CertValue $certString -StartDate $myCert.NotBefore -EndDate $myCert.NotAfter
1
2
3
4
5
# Get previsouly created certificate
az keyvault certificate download --vault-name "kvwecommon" --name "MyCert" -f MyCert.pem

# Upload the certificate to the SharePoint AAD Application
az ad sp credential reset --name "AAD_APP_OBJECT_ID" --cert "@~/MyCert.pem"

Grant Web Application to get Key Vault Secret

When using Microsoft.Azure.KeyVault library, we used to grant certificate (GET) access policy to certificate. But as this library is replaced by the Azure.Security .NET Libraries, we have to use the Keyvault.Secrets service because until now, there's no method provided to get a Key Vault Certificate with the certificate (GET) access policy. Furthermore, the Certificate in Key Vault is more a concept than just a type of Secret.

That's why we're going to setup a secret (GET) access policy.

Grant access through interface
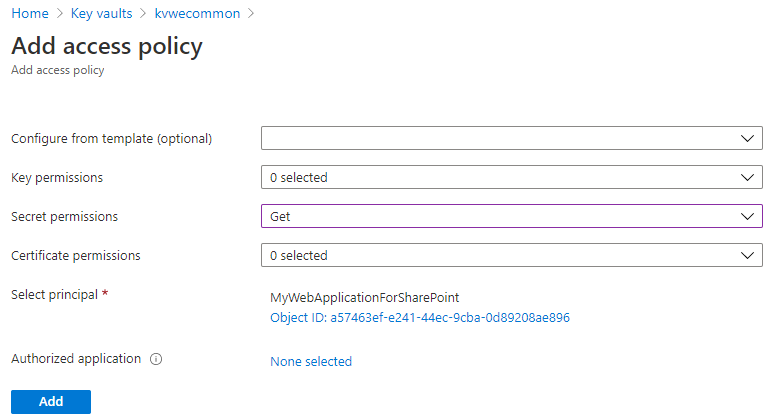
alt text

Grant access with code

1
2
3
4
5
# Retrieve Web Application service principal
$webappsp = Get-AzADServicePrincipal -DisplayName "MyWebApplicationForSharePoint"

# Assign the permission
Set-AzKeyVaultAccessPolicy -VaultName "kvwecommon" -ObjectId $webappsp.Id -PermissionsToSecrets get -PassThru
1
2
3
4
5
# Retrieve Web Application service principal objectId
az ad sp list --display-name "MyWebApplicationForSharePoint" --query [].objectId

# Assign the permission
az keyvault set-policy --name "kvwecommon" --object-id "WEB_APPLICATION_SERVICE_PRINCIPAL_OBJECT_ID" --secret-permissions get

Init ASP.NET Web Application Project

To init your project (.NET Framework 4.8 C#), you can follow this quickstart (and if you want to try with an API deployed in an Azure API, just select "Web API" instead of "MVC").

Get Nuget Packages (Azure, SharePoint)

Below the Nuget packages required to test the architecture:

Setup connection to Azure

To setup a connection to Azure through the Identity SDK, you can use the DefaultAzureCredential() class which will follow a specific mechanism based on the execution environment, which make this part easy to manage. To sum up, you'll be able to authenticate both in Visual Studio (as a user) and in Azure (as a managed identity / service principal) with the same method.

More info here (this article also explains how to configure connection to Azure from Visual Studio).

Below the snippet you can use to connect to the Key Vault, in order to get the certificate.

 1
 2
 3
 4
 5
 6
 7
 8
 9
10
11
private X509Certificate2 GetCertificate()
{
    string secretName = "MyCert"; // Name of the certificate created before
    string keyVaultName = "kvwecommon";
    Uri keyVaultUri = new Uri($"https://{keyVaultName}.vault.azure.net/");

    var client = new SecretClient(keyVaultUri, new DefaultAzureCredential());
    KeyVaultSecret secret = client.GetSecret(secretName);

    return new X509Certificate2(Convert.FromBase64String(secret.Value), string.Empty, X509KeyStorageFlags.MachineKeySet);
}

Setup connection to SharePoint

Once you got the certificate, you can authenticate to SharePoint site with it, in order to get a ClientContext object.

 1
 2
 3
 4
 5
 6
 7
 8
 9
10
11
12
private ClientContext GetAADAppOnlyClientContext(X509Certificate2 certificate)
{
    string aadApplicationId = "SHAREPOINT_AAD_APPLICATION_APP_ID";
    string tenantName = "contoso";
    string sharePointUrl = $"https://{tenantName}.sharepoint.com/";
    // If you want to query the User Profile, add "-admin" to the tenantName in the URL
    // string sharePointUrl = $"https://{tenantName}-admin.sharepoint.com/";

    string tenant = $"{tenantName}.onmicrosoft.com"; // This can also be the Tenant ID (GUID) instead of the Tenant Name (contoso.onmicrosoft.com)

    return new OfficeDevPnP.Core.AuthenticationManager().GetAzureADAppOnlyAuthenticatedContext(sharePointUrl, aadApplicationId, tenant, certificate);
}

Get Web Info

With the ClientContext object instantiated before, you can get for example info about your site.

 1
 2
 3
 4
 5
 6
 7
 8
 9
10
11
12
13
14
15
16
17
18
19
// ...

// Example in the "HomeController" class, adding a property to the ViewBag
public ActionResult Index()
{
    X509Certificate2 certificate = GetCertificate();

    ClientContext ctx = GetAADAppOnlyClientContext(certificate);

    Web currentWeb = ctx.Web;
    ctx.Load(currentWeb);
    ctx.ExecuteQuery();

    ViewBag.WebTitle = currentWeb.Title;

    return View();
}

// ...
1
2
3
4
5
6
7
8
9
@{
    ViewBag.Title = "Home Page";
}

<div>
    Title of the SP Web : @ViewBag.WebTitle
</div>

<!--...-->

Deploy the solution

Once you got everything, you can test your Web Application locally then by publishing it (right-click on the project and select Publish).

Then select Azure as target, Azure App Service (Windows) and select the correct Azure account, the subscription used until now, the resource group and the Web Application we created together (here rg-common and MyWebApplicationForSharePoint).

That's it

You should see something like this :
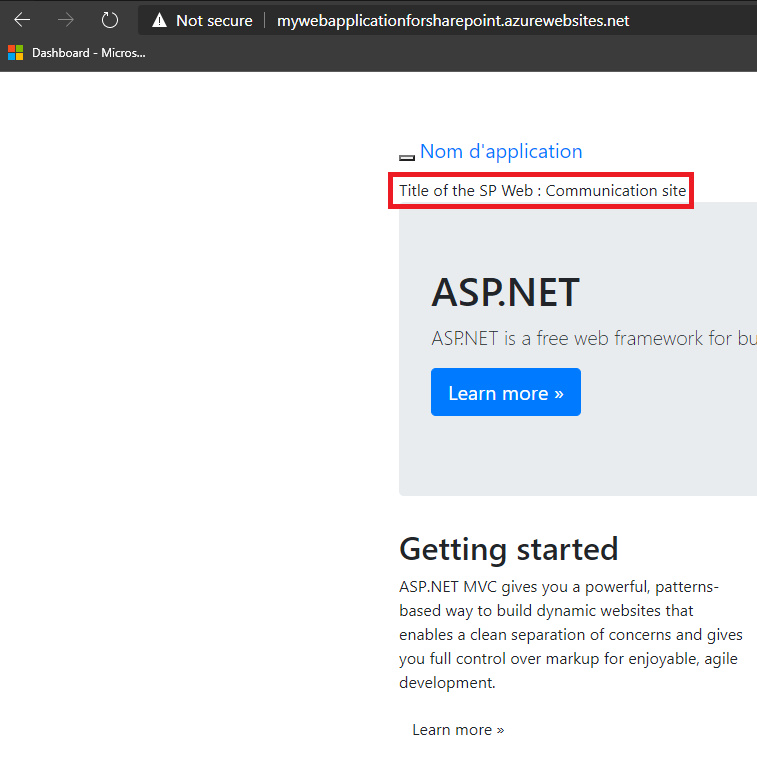
alt text

If you have any question or if you encounter any problem during the execution of the commands, feel free to send a Tweet or a DM 😉